Project
Linux Kernel USB Driver
A small driver used to illustrate native USB Linux Kernel programming.
Parts
Skills & Tools
- USB Specification
- Linux Kernel
- C
Narrative
Among the obstacles in developing Linux Kernel USB drivers is that:
The good news in this is that the USB spec itself is well documented and free.
To develop a device driver for USB, I started with:
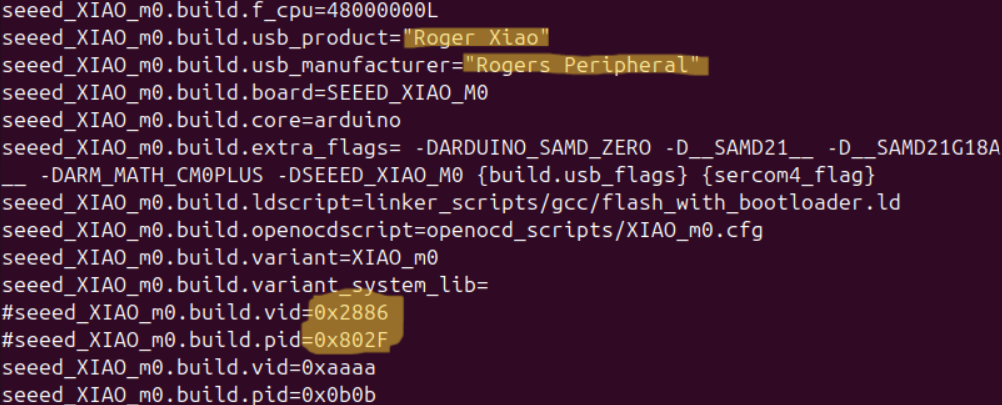 these VID/PID settings which could be overridden.
You can build an empty sketch and upload it. CAREFUL- If you need to reprogram it you’ll need to short the boot pin to ground. Otherwise the programmer won’t recognize your USB device with the fancy new VID/PID.
these VID/PID settings which could be overridden.
You can build an empty sketch and upload it. CAREFUL- If you need to reprogram it you’ll need to short the boot pin to ground. Otherwise the programmer won’t recognize your USB device with the fancy new VID/PID.
Some USB libraries also let you set the VID/PID immediately from the code itself. In the Xiao’s case, with the Adafruit TinyUSB library you can do.
My next step was to read through the USB Specification.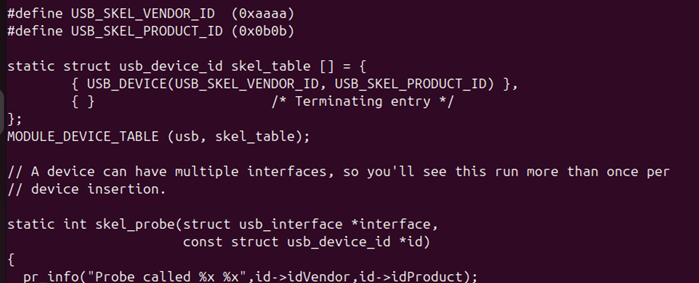
The probe function is called whenever a new device is plugged in. You also provide a list of IDS to the USB main driver through the MODULE_DEVICE_TABLE. The reason for the duplication is that since there are a lot of generic drivers the USB core will first go to the driver with the specific VID/PID if it’s listed in the MODULE_DEVICE_TABLE. If it’s not listed it will try generic drivers. If you didn’t have this mechanism there is a risk either a generic driver would grab your interface before you could or your probe function couldn’t assume that your driver would be the only owner of the interface and would have to wait for other interfaces to indicate their disinterest in the interface.
The USB specification assumes multiple configurations and types of data transfer. Serial, Audio, MIDI, Video, disk drive, etc. But they all boil down to URBs being transferred. Just like TCP, UDP, Datagram all boil down to IP packets.
I took the Arduino i2c_tiny_usb adapter project (Under File->Examples). You will likely need to install the Adafruit TinyUSB Library 3.6.0.
I installed this on the Xiao. Once that was done, when I plugged the Xiao into my linux box and it enumerated as /dev/i2c-0.
Then on the Linux side I installed usbmon and used it to trace packets. I then used i2cdetect to generate sample traffic.
I didn't want to risk rebooting my Linux box over and over again or corrupting the kernel. So I decided to build a qemu environment. You can use your current vmlinuz and initrd images and filesystems, but you have to be careful about syncing and making sure two separate writers don't corrupt your system. For my purposes this worked well:
https://github.com/rogerpease/LinuxKernelUSBModule
If I took this further I would probably use Spec Driven Development to develop custom URBs so I could control both sides of the interface.
- Many devices already have drivers which will start before yours. The Linux probe function is called when a USB device is detected. If your driver is not the first to register with the USB subsystem, it may not be able to claim the device.
- Many of those drivers are proprietary and their interfaces are not well documented.
- Many small boards/chips don’t have a ‘native’ USB interface. For example, the ESP32 board uses a FTDI CP2102 driver chip and connects to the main chip through UART. So even if we could change the VID/PID we'd still have the CDC-ACM interface.
The good news in this is that the USB spec itself is well documented and free.
To develop a device driver for USB, I started with:
- A device which will power up with a unique VID/PID. In my case I selected a spare Seeeduino Xiao.
- The Arduino GUI. Assuming you’re using the Arduino GUI, the USB VID/PID is configured at every powerup.
$HOME/.arduino15/packages/Seeeduino/hardware/samd/1.8.5/boards.txt
contained
these VID/PID settings which could be overridden.
You can build an empty sketch and upload it. CAREFUL- If you need to reprogram it you’ll need to short the boot pin to ground. Otherwise the programmer won’t recognize your USB device with the fancy new VID/PID.
Some USB libraries also let you set the VID/PID immediately from the code itself. In the Xiao’s case, with the Adafruit TinyUSB library you can do.
TinyUSBDevice.setid(0xaaaa,0x0b0b)
For your own lab purposes this is fine. If you are going to sell your product commercially you will need to get your own VID or at least your own VID/PID. PIDs start around $5000 and there are “only” 65K of them (for now).
My next step was to read through the USB Specification.
- USB is a packet-switched network consisting of URB packets. URB packets are similar to UDP Packets in an IP based switch.
- The device is the physical circuit you plug into the host.
- For every device there are one or more configurations. Most devices only need one configuration.
- Each configuration offers one or more interfaces for sending or receiving data. For instance, a USB Microphone may only have one interface but a printer/scanner might have at least two.
- Each interface has one or more endpoints which receive URBs, depending on the type of data the interface sends. The different URB (depending on the endpoint) types are interrupt, control, bulk and isochronous (essentially time-lapse streaming data).
- The interfaces are self-describing for most common functions.
The probe function is called whenever a new device is plugged in. You also provide a list of IDS to the USB main driver through the MODULE_DEVICE_TABLE. The reason for the duplication is that since there are a lot of generic drivers the USB core will first go to the driver with the specific VID/PID if it’s listed in the MODULE_DEVICE_TABLE. If it’s not listed it will try generic drivers. If you didn’t have this mechanism there is a risk either a generic driver would grab your interface before you could or your probe function couldn’t assume that your driver would be the only owner of the interface and would have to wait for other interfaces to indicate their disinterest in the interface.
The USB specification assumes multiple configurations and types of data transfer. Serial, Audio, MIDI, Video, disk drive, etc. But they all boil down to URBs being transferred. Just like TCP, UDP, Datagram all boil down to IP packets.
I took the Arduino i2c_tiny_usb adapter project (Under File->Examples). You will likely need to install the Adafruit TinyUSB Library 3.6.0.
I installed this on the Xiao. Once that was done, when I plugged the Xiao into my linux box and it enumerated as /dev/i2c-0.
Then on the Linux side I installed usbmon and used it to trace packets. I then used i2cdetect to generate sample traffic.
linux% insmod usbmon
linux% cat /sys/kernel/debug/usb/usbmon/3u
linux% i2cdetect /dev/i2c-0
This gave me an insight into the expected/actual commands in use.
I captured and discovered all the traffic.
From the trace from above you should see lines like
ffff9e00c0fb4180 1657276607 S Ci:3:008:0 s c1 01 0000 0000 0004 4 <
ffff9e00c0fb4180 1657277850 C Ci:3:008:0 0 4 = 0100ff8e
ffff9e00c0fb4180 1658688197 S Co:3:008:0 s 41 07 0000 0008 0000 0 Checks i2c a
ffff9e00c0fb4180 1659084781 C Co:3:008:0 0 0
ffff9e00c0fb4180 1659084918 S Ci:3:008:0 s c1 03 0000 0000 0001 1 <
ffff9e00c0fb4180 1659086047 C Ci:3:008:0 0 1 = 01
ffff9e00c0fb4180 1659086236 S Co:3:008:0 s 41 07 0000 0009 0000 0
ffff9e00c0fb4180 1659087182 C Co:3:008:0 0 0
ffff9e00c0fb4180 1659087214 S Ci:3:008:0 s c1 03 0000 0000 0001 1 <
ffff9e00c0fb4180 1659089366 C Ci:3:008:0 0 1 = 02
With that, I was able to implement a USB driver for the Arduino Xiao.
The steps it follows are:
- Register the USB device
- Implement the probe function to return true on the 0xaaaa/0x0b0b VID/PID
- Implements open/close/read/write so the user can issue URBs through the device file.
I didn't want to risk rebooting my Linux box over and over again or corrupting the kernel. So I decided to build a qemu environment. You can use your current vmlinuz and initrd images and filesystems, but you have to be careful about syncing and making sure two separate writers don't corrupt your system. For my purposes this worked well:
sudo qemu-system-x86_64 \
-enable-kvm \
-cpu host \
-m 8G \
-smp 2 \
-kernel /boot/vmlinuz-$(uname -r) \
-initrd /boot/initrd.img-$(uname -r) \
-append "root=/dev/vda7 rw console=ttyS0" \
-drive file=/dev/nvme0n1,format=raw,snapshot=on,if=virtio \
-device qemu-xhci,id=usb \
-device usb-host,vendorid=0xaaaa,productid=0x0b0b \
-nographic
The user can then open /dev/simpleusb0 and issue URBs through it (using the read/write system calls demonstrated in the Test.py script).
https://github.com/rogerpease/LinuxKernelUSBModule
If I took this further I would probably use Spec Driven Development to develop custom URBs so I could control both sides of the interface.