Project
Zynq RPN Calculator
Connceting an RPN Zynq-7000 PS/PL TUL-2 board to Linux via a device driver
Parts
Skills & Tools
- Linux Kernel
- Embedded Linux
- C
- Python
- ARM
- Verilog
- Vivado
Narrative
A major barrier in learning the Linux Kernel is locating target hardware. Specifically, you need to find hardware which does not immediately rely on, does not have a driver already written, and has available documentation.
I decided to build my own peripheral to show how it is done.
RPN is a stack-based methodology used by high end scientific calculators.
Consider the equation (74+21)*(3+7). In RPN the steps for this calculation are as follows:
| Table 1: RPN Operation | |||
|---|---|---|---|
| Operation | Value | State | Comment |
| Reset | [] | Reset | |
| Push | 74 | [74] | Push 74 onto stack |
| Push | 21 | [21,74] | Push 21 onto stack |
| Add | [95] | Add the two lowest elements and put in bottom element | |
| Push | 3 | [3,95] | Push 3 onto stack |
| Push | 7 | [7,3,95] | Push 7 onto stack |
| Add | [10,95] | Add the two lowest elements and put in bottom element | |
| Mul | [950] | Final Value | |
| Pop | [] | Pop out | |
As abstruse as this approach first seems, it is actually easier when you are working with very complex calculations.
Assuming we don’t need complete stack visibility, our peripheral will use three registers:
| Table 2: Register Map | ||
|---|---|---|
| Register | Address | Description |
| 0 | 0x0 | Value to pop on stack. |
| 1 | 0x4 | One-hot command (see Table 3) |
| 2 | 0x8 | Value of stack element 0. |
| Table 3: One-hot commands | |
|---|---|
| Byte Value | Command |
| 0 | nop |
| 1 | reset |
| 2 | push |
| 4 | pop |
| 8 | add |
| 16 | sub |
In a target product I would add features such as context management, self-identification, and self-description registers to allow for multiple users and ensure IP version matched the kernel module.
Uploading the peripheral onto the FPGA fabric requires creating a new IP and indicating you are doing a AXI Peripheral and instance the ZynqRPNCalculator IP in an AXI Slave Interface. I had done a tutorial several years ago on this. This will provide a register file and wrapper for interconnect. You then package that IP so it looks like another offering in your IP package library. I also updated the default Xilinx register file so that it would not save the one-hot states (I only want the command issued for one clock cycle) and would route the stack-zero value to register 2 for reading. Then I packaged the IP in a local repository.
Now instantiate the ZynqRPNCalculator IP in a board design. You should be able to generate a bitstream pretty easily (I have the TUL Pynq-Z2 bitstream and hwh files if you need them.
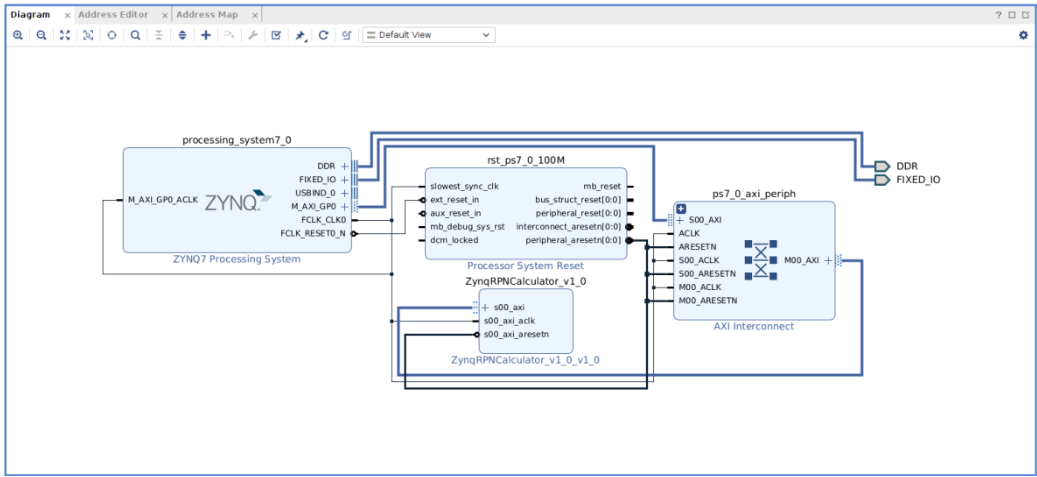
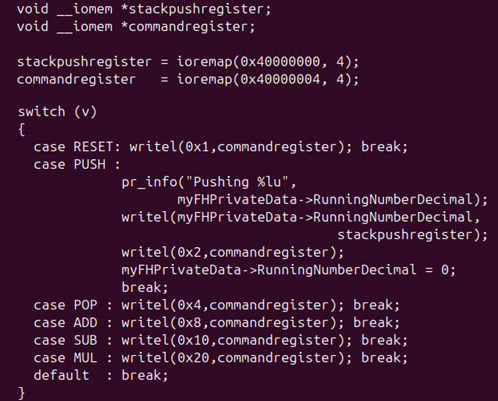
To develop the kernel module I used a simple character device driver. I developed a format where r123u456ua would be reset, push 123, push 456, and add (yielding 579).
The Zynq Processing system memory-maps the peripherals you create to a specific address space (you can have multiple peripherals). You can get that address with a python call (it’s in the sanity check script).
print("Base Address 0x%x" % overlay.ZynqRPNCalculator_v1_0.mmio.base_addr)
In this case, 0x4000000.
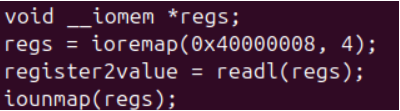
The kernel has access to the registers but you need to go through a similar process to accessing memory pages.
The stack 0 register can be read:
Likewise the control register:
The next challenge here was finding a compile environment. The build environment on-board the embedded system didn't have the proper packages. I did some detective work and figured out how to build from the published distributions. That was enough for kernel module compiles. I would use petalinux if I needed to rebuild the whole kernel image.
With that, I was able to integrate the kernel module and seamlessly access my new peripheral through a kernel service rather than through Userspace.
Here you can see the output given our sample input of adding 123 to 456 and getting 579:

You are welcome to review the Source Code and see my presentation to the Houston Linux User Group.